| |
 |
|
|
|
 |
|
 |
| |
| Boat Fishing & Boating A new forum at Striped-Bass.com for those fishing from boats and for boating in general |
 |
|
 12-14-2020, 12:27 AM
|
#1
|
|
Registered User
Join Date: Mar 2012
Location: CT
Posts: 2,289
|
Boat Project
I purchased a 2005 Maritime skiff around this time last year which had a 2015 suzuki df90a for power still under warranty. After filling out the paperwork for the warranty transfer, Suzuki sent me an additional year warranty contract.
I had been casually browsing for this hull for a while. A friend had taken me out on his because our Vineyard vacation stays happened to overlap, I loved the simple no-nonsense layout of it, wide beam and dry smooth ride. We had a good day fishing too!
What a blessing to have it this year with two young boys. With most everything closed due to COVID, the boat really provided us with an escape.
The project: The boat is a single battery setup. I also had several no-start, then magically start days on the water or at the ramp. So the project began as "I need a two battery system".
After doing a visual inspection of the electrical connections and the rat nest of wires, I was lucky the boat started/ran and anything worked on the boat. So the goal was get "enough" tog outtings in to be content then start the process of fixing the electrical issues.
I bought Nigel Calder's book "Mechanical and Electrical Manual" to gain an understanding of a boat's electrical system, it's a good book and written in a way in which even I understand it and is based on ABYC standards.
I quickly noticed a major flaw in the electrical system is that the 4awg main wires that operate the starter on my outboard are not the correct gauge wire. I cannot speak to other outboard manufacturer's supplied wires but my Suzuki comes stock with 2 options and both are 4 awg, which are rated for batteries located near the outboard. In my case the shortest run which might be a stretch is 12' one way, which would be a 2awg, and anything over that a 0awg, per the suzuki manual for this model.
Enter the other wants and needs to the project. Some shade! I found a t top that would work around the existing console, however that solution would cost a lot more to rig any lights or a radar. So I went back to the classifieds on a search for a hard top console. Found one off a seacraft rigged with a bunch of items I was looking for and picked it up for a good price in line with a T top, big score.
As of today, I have the boat de-rigged, everything is out and the deck cleaned up. I put a step ladder in the boat at the console area to give myself a working area under a cover so I can pull wires etc. This might be boring to most but any feedback is welcomed, and any "how's it goings" will help me stay on target. April is my goal.
I'll attach some pics along the way.
-Matt
|
|
|

|

|
|
12-14-2020, 01:51 AM
|
#2
|
|
Registered User
Join Date: Mar 2012
Location: CT
Posts: 2,289
|
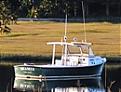
Original
IMG_20200507_174955326_HDR.jpg
This is the first picture in May 2020 when the boat was towed to my house.
|
|
|
|
|
|
|
12-14-2020, 02:00 AM
|
#3
|
|
Registered User
Join Date: Mar 2012
Location: CT
Posts: 2,289
|
My Son Approves
"Let's go dad" I heard this so. many. times.
123264.jpeg
between tracking down paperwork, submitting it, and getting a response during the covid shutdown took months.
|
|
|
|
|
|
|
12-14-2020, 06:22 AM
|
#4
|
|
Registered User
Join Date: Jan 2006
Posts: 1,698
|
Great project! Wiring issues are the worst.....smart move redoing it all.
Located my battery in the port stern locker...for a shorter run to the outboard.
Get plenty of heat shrink tubing for all the connections.
|
|
|
|
|
|
|
12-14-2020, 07:22 AM
|
#5
|
|
User
Join Date: Jun 2012
Location: Cape Cod
Posts: 5,377
|
Nice boat, good luck
Great project, looking forward to seeing the progress..
I started with a rats nest under the console years ago and spent an off season under the wrap re doing it....
Like Bob said... good shrink wrap connectors,,, I included an additional shrink wrap over that.... and ratcheting crimps are a must...
Check the existing cable ends, they can be corroded under the shrink!
THT forums can be a great help..
Lets go dad .......... :-)
|
|
|
|
|
|
|
12-14-2020, 07:35 AM
|
#6
|
|
Registered User
Join Date: Sep 2003
Location: Libtardia
Posts: 21,554
|
Nigels books are awesome.
Posted from my iPhone/Mobile device
|
|
|
|
|
|
|
12-14-2020, 09:49 AM
|
#7
|
|
Registered User
Join Date: Jan 2006
Posts: 1,698
|
Harbor freight has heat shrink assortment pack at very reasonable price
Posted from my iPhone/Mobile device
|
|
|
|
|
|
|
12-14-2020, 11:47 AM
|
#8
|
|
Registered User
Join Date: Dec 2018
Location: Side Tracked City, CT
Posts: 166
|
Check out bestboatwire.com. I bought a lot of stuff from them a few years back for my project.
|
|
|
|
|
|
|
12-15-2020, 01:43 PM
|
#9
|
|
Registered User
Join Date: Mar 2012
Location: CT
Posts: 2,289
|
Thanks all.
RMarsh, I wish the boat was designed for a rear battery housing but it is a self draining hull via scuppers so it'd be wet. I do like the added deck space so the trade off is big wire to the console. I'll check out H.F. for shrink wrap, I found some that worked well to set around new battery terminal connectors before I ventured out this year.
Gup, rats nest for sure, the main harness wires are probably 10' in excess, I understand service loops but this could have been more neatly done. I have ratcheting crimpers, and a big pneumatic crimper for main wire crimping. I did make the mistake of buying some items/tools prior to beginning research and reading a good chunk of Nigel's book. I.E. bought a Klein tools crimper when I should have waited until I knew which brand of wire I'd be purchasing. If it passes a pull test prior to shrinking I'll be a happy clamper.
Suburban, thank you. looks like good stuff, naturally the guage wire I need is out of stock haha.
|
|
|
|
|
|
|
12-15-2020, 02:10 PM
|
#10
|
|
Registered User
Join Date: Mar 2012
Location: CT
Posts: 2,289
|
Pilothouse
pilothouse.jpg
Here is the pilothouse I picked up. It came off a SeaCraft but was custom built and refurbished at least once based on the helm area. Came with a horn, 5 lumitec spreader lights, a nice helm and SeaStar hydraulic steering. It's heavy so the install will be fun.
I plan to do all the wiring, new switch panel/dash cover, guages etc in my garage first, connect to most of the loads as well before setting it in.
|
|
|
|
|
|
|
12-15-2020, 03:22 PM
|
#11
|
|
Registered User
Join Date: Feb 2003
Location: Kingston, Ma
Posts: 2,267
|
Sick ass doghouse
Posted from my iPhone/Mobile device
|
|
|
|
|
|
|
12-15-2020, 03:40 PM
|
#12
|
|
Registered User
Join Date: Jan 2006
Posts: 1,698
|
Genuine Dealz...good source for marine wiring supplies
Posted from my iPhone/Mobile device
|
|
|
|
|
|
|
12-15-2020, 08:18 PM
|
#13
|
|
Registered User
Join Date: Jan 2004
Location: South Shore
Posts: 491
|
"I'll be a happy clamper..." LOL!! Good luck with the project, looks like fun!
|
|
|
|
|
|
|
03-23-2021, 12:04 AM
|
#14
|
|
Registered User
Join Date: Mar 2012
Location: CT
Posts: 2,289
|
I suppose I should update my progress here and stop hijacking Wayne's "Radar is a Go!" thread which can be read here http://www.striped-bass.com/Stripert...ad.php?t=97143
Sorry Wayne, I forgot I even started this thread.
Update 1: The console is still not in my boat and I am glad I did not do that first, instead it has been in my garage over the winter months where I can work on it with lights and occasionally electric heating if I wasn't tired from an occasional ice fishing trip.
Here's why, the "new" doghouse/cc pilothouse console was previously in 1 or 2 boats and has experienced overlays etc, nicely done artistic work for fit and finish. As nice as that might be, we all know a clean slate is the best starting point, and this was not a clean slate for my own switches, gauges, etc.
I ordered panels for it to essentially cover it up and tried my best to place the hidden stud screws in locations where I could get to and hold the panels down but the materials, terrible access and room from behind cost me many many hours of dremel work to cut pockets for washers, nuts, and tooling to secure the panels, which brought me to mid - february. |
|
|
|
|
|
|
03-23-2021, 06:48 AM
|
#15
|
|
Seldom Seen
Join Date: May 2001
Posts: 10,388
|
What are those Garmin units?
|
Americans have the right and advantage of being armed, unlike the people of other countries, whose leaders are afraid to trust them with arms. James Madison.
|
|
|
|
|
03-23-2021, 07:43 AM
|
#16
|
|
Registered User
Join Date: Jun 2012
Location: Somerset MA
Posts: 9,104
|
Love the dog house had on on my1st boat the only issue the previous owner was shorter than I was so off it went,,, do you think it may affect your center of Gravity negatively, PS I dont think you hijacked anything your project is more interesting then mine LOL
Posted from my iPhone/Mobile device
|
|
|
|
|
|
|
03-24-2021, 01:03 AM
|
#17
|
|
Registered User
Join Date: Mar 2012
Location: CT
Posts: 2,289
|
Ross I went with the 942 which will be dedicated to my radar and the 1243 because it has the capability for side scan. I added the g3 vision mapping which is basically the NOAA bottom scans. https://maps.ngdc.noaa.gov/viewers/bathymetry/
In the viewer turn off the two checked boxes on the left and turn on the two boxes with BAG footprints and shaded relief then pan and zoom into your favorite rocky areas.
Wayne, yes I'm a little nervous, however the pioneer version of my boat (same hull) has a doghouse of similar size (slightly narrower). Im thinking I'll bolt the doghouse down temporarily with minimal screws make my steering, and wiring connections, then sea trial it in case it needs to be shifted forward or backwards. I have some room to play with in either direction. If it doesn't work it'll be the first time I've ever been seasick.
Posted from my iPhone/Mobile device
Last edited by Linesider82; 04-28-2021 at 10:56 PM..
|
|
|
|
|
|
|
03-27-2021, 07:16 PM
|
#18
|
|
Registered User
Join Date: Mar 2012
Location: CT
Posts: 2,289
|
Update 2:
After dryfitting the panels and building mounts for the electronics I started on wiring. The boat had a small piece of plywood mounted to one side and I recalled seeing the old switch board with breakers underneath was positioned on the front lower vertical face. With two young boys 6 & 3 I didn't wish to replicate the location and the alternative meant I needed more mounting space.
I removed the piece of plywood and replaced it with a 22"*35" piece of azek rather than treating a new piece of ply with resin or epoxy. Plus being white it would illuminate the wiring better with a light, and pvc won't soak in and hold water.
It's setup for a 2 battery system. I used a bluesea combined charger / acr which will give me a charge while under power if the starting battery is at 12.8 and do the same thing after a day on the water with an a/c plug. The house battery runs to a resettable circuit breaker panel which protect the loads, the power heads to my new switch panel and back down to busbars. I used white shrink wrap on top of the heat shrink ring terminals to label all the wires.
Kinda got to a point where I needed to piece out the remaining wiring and required wire lugs but noticed if I doubled up a few negative wires on the bus bar I could test everything on the switch panel. So I found two of my old battery cable leads and hooked it up. Test went great and it felt good.
I opened the cover to the hull and pulled out the old main power wires, ran new ones, pulled out the old cable steering and pulled the hoses and mounted the hydraulic cylinder.
Plan is to swing the console in over Easter weekend, finish the boat just in time for work to get crazy.
Posted from my iPhone/Mobile device
|
|
|
|
|
|
|
03-27-2021, 08:17 PM
|
#19
|
|
Seldom Seen
Join Date: May 2001
Posts: 10,388
|
Quote:
Originally Posted by Linesider82

In the viewer turn off the two checked boxes on the left and turn on the two boxes with BAG footprints and shaded relief then pan and zoom into your favorite rocky areas.
Posted from my iPhone/Mobile device
|
I will have to go over what this is, on what screen, to accomplish what?
I got the echomap 942 UHD sv with the gt 54 ducer. All I should need... great price too. Start getting under the cover soon. |
Americans have the right and advantage of being armed, unlike the people of other countries, whose leaders are afraid to trust them with arms. James Madison.
|
|
|
|
|
03-27-2021, 09:29 PM
|
#20
|
|
Registered User
Join Date: Mar 2012
Location: CT
Posts: 2,289
|
Quote:
Originally Posted by nightfighter
I will have to go over what this is, on what screen, to accomplish what?
I got the echomap 942 UHD sv with the gt 54 ducer. All I should need... great price too. Start getting under the cover soon.
|
Hi Ross it's the NOAA data viewer (website) check out the link I posted and uncheck those two boxes and check the "BAG" boxes it's like a picture of the bottom of the ocean. I got the Norfolk, VA to Boston g3 vision card it includes that imagery/scans. It's a lot less expensive than other similar charts .. strike lines I think is one.
Posted from my iPhone/Mobile device |
|
|
|
|
|
|
03-30-2021, 09:26 AM
|
#21
|
|
Registered User
Join Date: Mar 2012
Location: CT
Posts: 2,289
|
Been working nights so it's been nice from the standpoint of waking up and working on the boat during the work week without interrupting family time.
I fixed my own error in the panel this morning by printing a circle to scale of my Tachometer/engine monitor guage and carefully using a dremel on the panel material with a router plate on it by recessing the back. Snug fit. I'm going to use the horseshoe shaped bracket to create a secure mount by bending the bottom 1/2" or so outwards, drilling them out and use epoxy to set bolts into the backside of the panel. Let it cure with the bolts in place for a few days then tighten up the bolts.
Posted from my iPhone/Mobile device
|
|
|
|
|
|
|
04-01-2021, 10:26 AM
|
#22
|
|
Registered User
Join Date: Mar 2012
Location: CT
Posts: 2,289
|
Wiring pt1: New mount surface.
Here's my progress since 3/9 on wiring, I know, super boring right? I actually think this is the best part because it's so important for safety and if a problem arises on the water, the ability to quickly diagnose the issue. It was also the portion of the project that I had the least knowledge of but Nigel Caulder's book and youtube were great resources particularly Jeff Cote from Pacific Yatch Systems video library were tremendously helpful.
Under the console was a small piece of plywood which I mentioned in a previous post. I removed it and this was my blank canvas before beginning any wiring.
3-09-21.jpg
I cut a piece of PVC board to fit the available space and was able to slide it into position. I had 2 pieces of hardware that I wanted to mount from the back so I took the pvc board out and secured my battery switch and charger/ACR.
3-13-21.jpg
To mount the board solo I propped the panel up then wedged it and drilled the holes. My eldest son got home from school and I said hey come give me a hand, so he held the bolts in place from the front of the console as I slid the panel over them. I had to rig a pin to hold a wrench to tighten them down because of the nylock nuts.
|
|
|
|
|
|
|
04-01-2021, 10:51 AM
|
#23
|
|
Registered User
Join Date: Mar 2012
Location: CT
Posts: 2,289
|
Wiring pt2: Breaker block, fuses, terminal blocks, and busses
For this part I could have done a lot better if I thought about it a little more, but ultimately decided to "just put it in" and connect things LOL.
I'll come back to this in a minute.
3/19 Mounted circuit breaker block, main thermal fuse, terminal block, and bus bar
3-19-21.jpg
3/22 connecting more loads, and realized I'm running out of real-estate on the negative bus, and don't like stacking wiring.
3-22-21.jpg
3/31 added another bus, and the main negative bus
3-31-21.jpg
What I should have done differently: The terminal block positive loads and negative busses should have been parallel to create a single line of wiring and similar lengths of positive and negative wiring, and I also should have flipped the main breaker block over to have the negative bus it has closer to the group of negative busses on my panel.
What is left: The large cable connections between the battery and the loads pos & neg. I dropped the picture into my cad program and made myself a diagram of wire sizes and hardware remaining to order, priced it out on AMZ and also sent it to a couple marine stores to compare. Still waiting to hear back which seems to be the theme these days. I ran new main wires to the engine and also mounted the hydrolic steering cylinder and pulled the hydraulic lines, but now I'm a little short on "work" for in regards to keeping busy on the project.
|
|
|
|
|
|
|
04-01-2021, 11:17 AM
|
#24
|
|
Registered User
Join Date: Mar 2012
Location: CT
Posts: 2,289
|
After getting to this point I had a thousand yard stare trying to figure out what to do next... and it hit me that if I hooked up a battery I could test almost everything.
SWITCH-PANEL.jpg
The switch panel looks great, the dimmer switch controls the back lighting, push for on, and it is also a built in dimmer switch so holding it cycles through the intensity up and down, it also turns on/off with the last setting. The Nav/Anchor button is all on, push again just anchor, push again off. the photon torpedoes is the horn/momentary switch, the rest are on/offs.
Here is the dash layout at the moment
PANELS.jpg
|
|
|
|
|
|
|
04-01-2021, 11:24 AM
|
#25
|
|
Registered User
Join Date: Mar 2012
Location: CT
Posts: 2,289
|
test test:
nav / courtesy on the console
NAV-COURTESY.jpg
spreaders
SPREADER-LTS.jpg
leaning post courtesy
LEAN-POST-LTS.jpg
what was cool about the courtesy lights, lumitec aruba model was the housing is translucent, so placing them in the leaning post also lights up the area where I store a cooler. I don't have a way to "hide" the wire to the leaning post but have one of those adhesive foam helm pads which I'll rout out a channel on the under side and run it from the helm to the leaning post.
|
|
|
|
|
|
|
04-01-2021, 12:30 PM
|
#26
|
|
Registered User
Join Date: Mar 2004
Location: Marshfield, MA
Posts: 1,733
|
Very nicely done
Posted from my iPhone/Mobile device
|
|
|
|
|
|
|
04-01-2021, 01:22 PM
|
#27
|
|
Seldom Seen
Join Date: May 2001
Posts: 10,388
|
Nice! Sent you a PM. And just ordered that book!  |
Americans have the right and advantage of being armed, unlike the people of other countries, whose leaders are afraid to trust them with arms. James Madison.
|
|
|
|
|
04-01-2021, 01:42 PM
|
#28
|
|
Registered User
Join Date: Jun 2012
Location: Somerset MA
Posts: 9,104
|
fantastic Job ! I get envious when I see people with your skill .. I am a ham and egg'r with anything mechanical or wood related
|
|
|
|
|
|
|
04-01-2021, 04:54 PM
|
#29
|
|
Registered User
Join Date: Feb 2003
Location: Kingston, Ma
Posts: 2,267
|
Quote:
Originally Posted by wdmso
fantastic Job ! I get envious when I see people with your skill .. I am a ham and egg'r with anything mechanical or wood related
|
Wayne as we always say, who's smarter, u or the wood
This has been just as enjoyable of a project to watch transpire as rmarsh's stair projects ( and I'm a nail pounder)
Envious of the dog house. It looks awesome
Posted from my iPhone/Mobile device |
|
|
|
|
|
|
04-01-2021, 10:14 PM
|
#30
|
|
Registered User
Join Date: Mar 2012
Location: CT
Posts: 2,289
|
Thanks all, hoping Saturday works out to move it into the boat. The process has been thoroughly enjoyable.
Posted from my iPhone/Mobile device
|
|
|
|
|
|
|
|
| Thread Tools |
|
|
| Display Modes |
 Linear Mode Linear Mode
|
 Posting Rules
|
You may not post new threads
You may not post replies
You may not post attachments
You may not edit your posts
HTML code is Off
|
|
|
All times are GMT -5. The time now is 03:21 AM.
|
| |